RabbitMQ
什么是RabbitMQ?
高性能的异步通信组件
时效性差,并发性能高
同步异步调用
同步调用
同步调用的优势:
时效性强,等待到结果后才返回
问题:
拓展性差
性能下降
级联失败问题
异步调用
异步调用的三个角色
消息发送者:投递消息的人,调用方
消息代理:管理、暂存、转发消息
消息接收者: 接受消息的人,服务提供方
优势:
解除耦合,拓展性强
无需等待,性能好
故障隔离
缓存消息,流量削峰填谷
问题:
不能及时得到调用结果,时效性差
不能确定下游业务是否成功
业务安全完全依赖于消息代理(Broker)的可靠性
RabbitMQ开始
RabbitMQ的安装
Docker镜像拉取
docker pull rabbitmq
部署
docker run -d –name rabbitmq -p 5672:5672 -p 15672:15672 rabbitmq
创建用户
rabbitmqctl add_user admin your_password
如果拉取镜像部署完,并且端口已开放,还是无法访问,这说明RabbitMQ管理插件未启用,进入容器后,输入rabbitmq-plugins enable rabbitmq_management 即可
核心概念
publisher:消息发送者
consumer:消息的消费者
queue:队列,存储消息
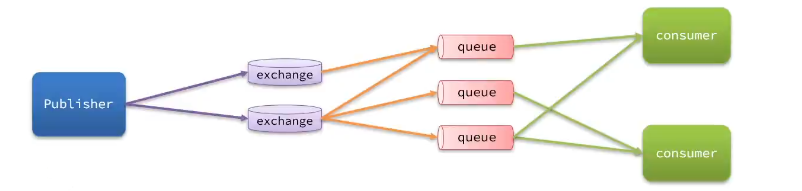
exchange:交换机,负责路由、转发消息,没有存储消息的能力
virtual-host:虚拟主机,起到数据隔离的作用

快速入门
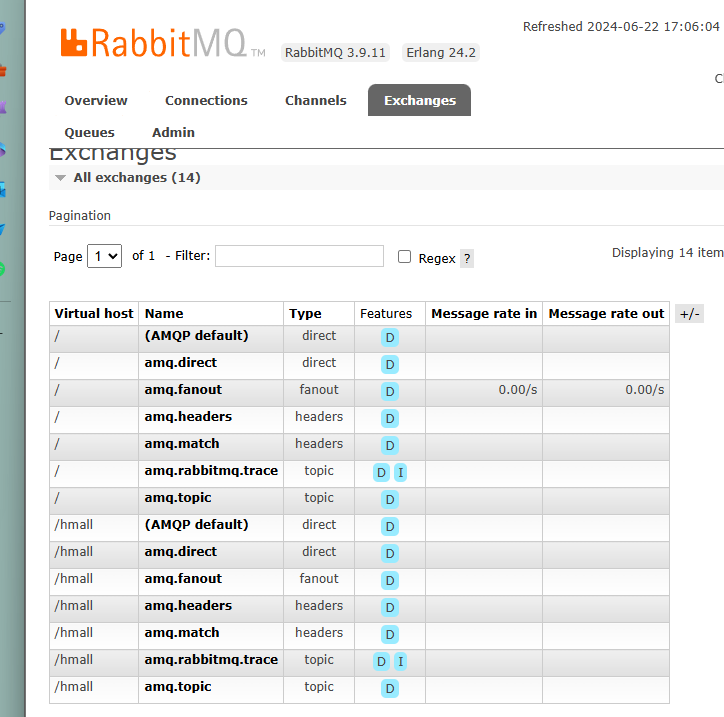
在RabbitMQ控制台完成下列操作:
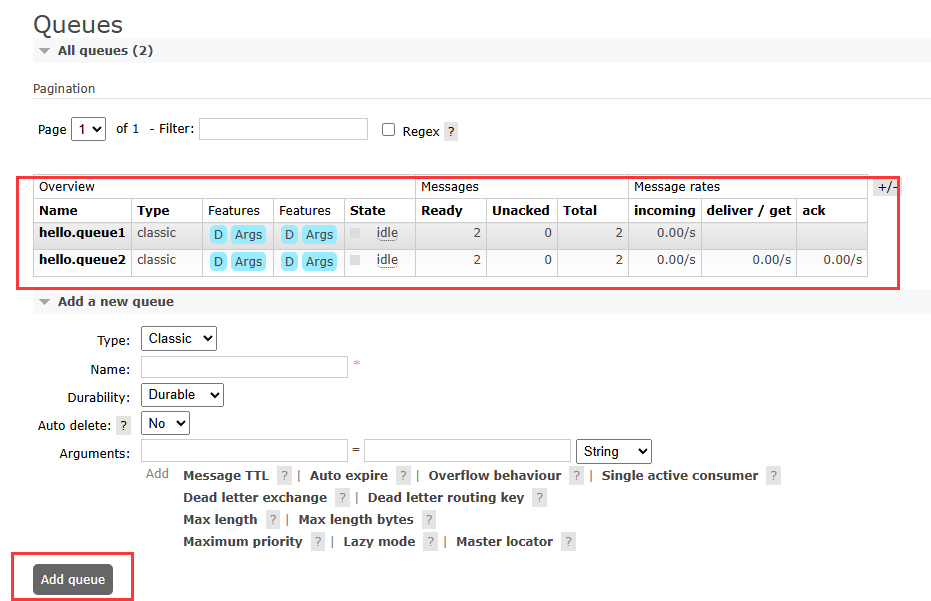
新建队列hello.queue1和queue2
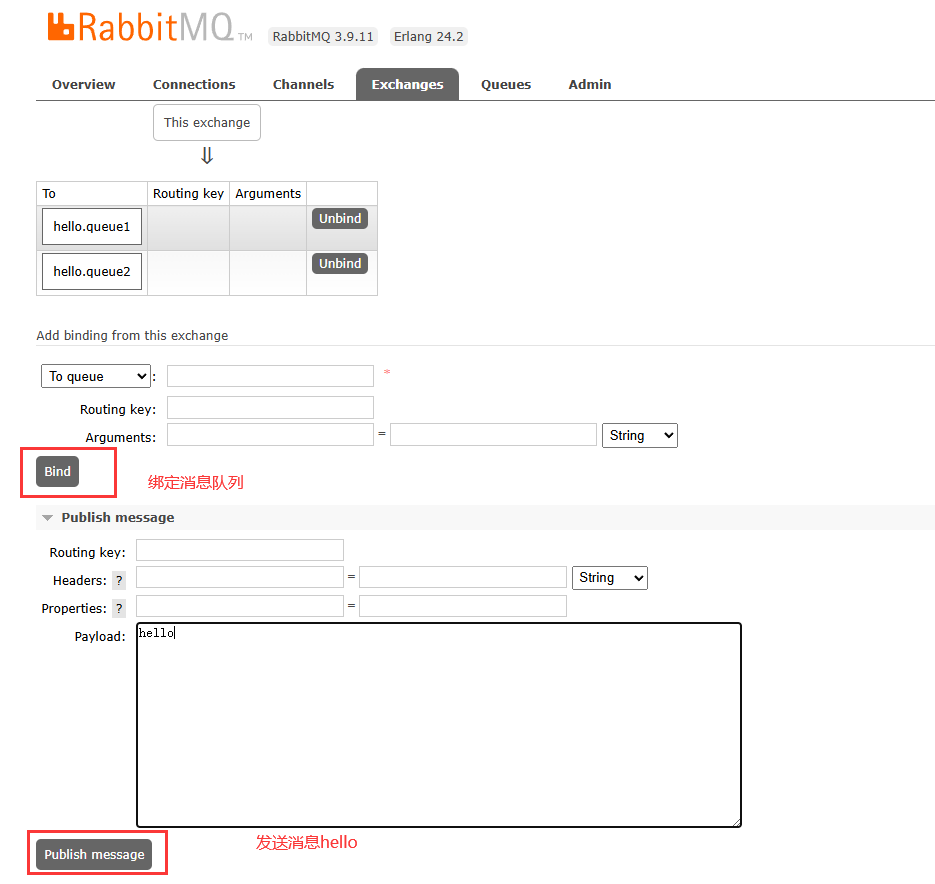
向默认的amp.fanout交换机发送一条消息
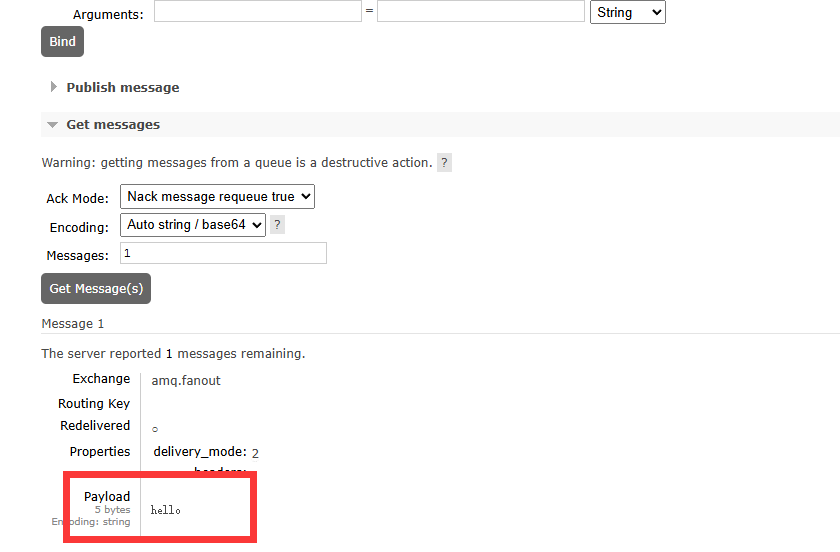
查看消息是否到达hello.queue1和hello.queue2
新建两个队列
交换机绑定两个队列,并向其发送消息
队列接受到消息
数据隔离
在rabbitmq控制台新建一个用户,给他admin权限,并为其创建一个虚拟主机,他只具有查看其它消息队列及其其它信息的权限,不能对别的用户的数据进行干涉,不同的虚拟主机之间出现数据隔离的现象。
JAVA客户端的使用
AMQP和Spring AMQP
AMQP:
Advanced Message Queuing Protocol,用于应用程序之间传递业务消息的开放标准协议。语言无关性-符合微服务中的独立性要求。
Spring AMQP:
基于AMQP的一套API规范,提供发送和接受消息的模板。
其中,Spring-AMQP是基础抽象,Spring-Rabbit是底层的默认实现。
快速入门
SpringAMQP收发消息
1.引入spring-boot-starter-amqp依赖
2.配置RabbitMQ服务端消息
3.利用RabbitTemplate发送消息
4.利用@RabbitListener注解声明要监听的队列,监听消息
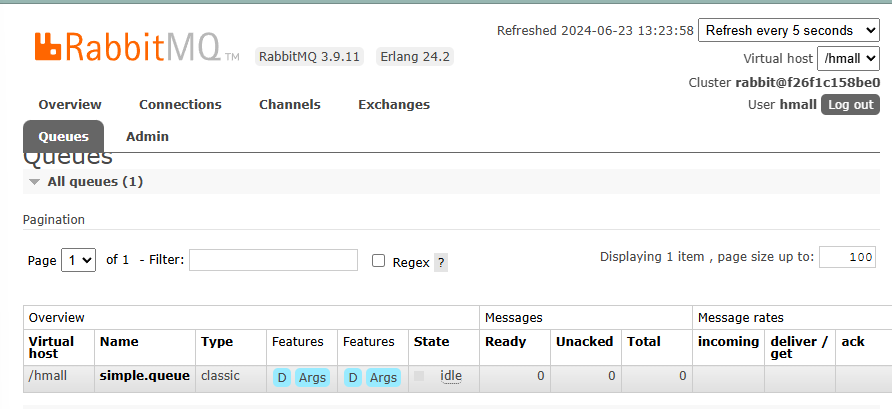
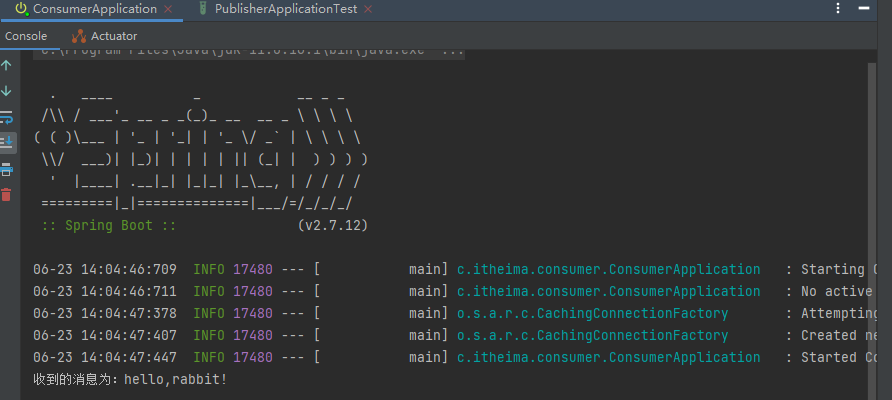
用一个项目简单描述rabbitMQ消息的收发过程,再rabbitMQ的网页端注册一个hmall的用户,新建一个simple.queue的消息队列,用于模拟publisher消息发送端发送消息到simple.queue,由消息队列转发消息到consumer,consumer监听pulisher所发送的消息。
1.引入依赖
这里依赖是父项目中的,publisher与comsumer是两个子项目
1
2
3
4
5
6
7
8
9
10
11
12
13
14
15
16
17
18
19
20
21
22
23
| <parent>
<groupId>org.springframework.boot</groupId>
<artifactId>spring-boot-starter-parent</artifactId>
<version>2.7.12</version>
<relativePath/>
</parent>
<dependencies>
<dependency>
<groupId>org.projectlombok</groupId>
<artifactId>lombok</artifactId>
</dependency>
<dependency>
<groupId>org.springframework.boot</groupId>
<artifactId>spring-boot-starter-amqp</artifactId>
</dependency>
<dependency>
<groupId>org.springframework.boot</groupId>
<artifactId>spring-boot-starter-test</artifactId>
</dependency>
</dependencies>
|
2.配置RabbitMQ服务端
publisher发送消息端的yml配置
1
2
3
4
5
6
7
| spring:
rabbitmq:
host: 127.0.0.1
port: 5672
virtual-host: /hmall
username: hmall
password: 123
|
3.利用RabbitTemplate发送消息
写一个publisher端的测试类,用于模拟发送消息
1
2
3
4
5
6
7
8
9
10
11
12
13
| @SpringBootTest
class PublisherApplicationTest {
@Autowired
private RabbitTemplate rabbitTemplate;
@Test
void testSendMessage2Queue(){
String queueName = "simple.queue";
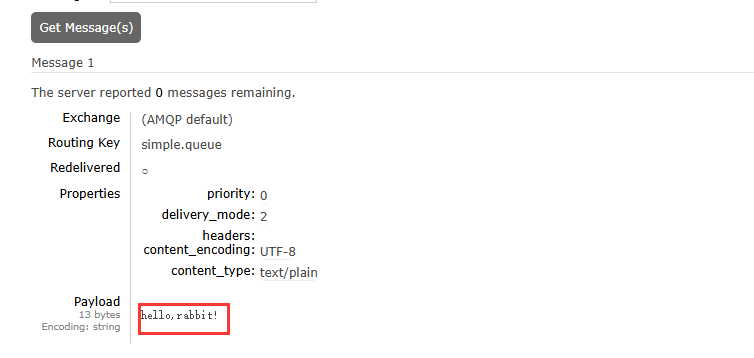
String msg = "hello,rabbit!";
rabbitTemplate.convertAndSend(queueName,msg);
}
}
|
4.配置consumer端的配置文件
1
2
3
4
5
6
7
| spring:
rabbitmq:
host: 192.168.150.101
port: 5672
virtual-host: /hmall
username: hmall
password: 123
|
5.消息接收
利用RabbitListener来声明要监听的队列信息
将来一旦监听的队列中有了消息,就会推送给当前服务,调用当前方法,处理消息。 可以看到方法体中接收的就是消息体的内容
1
2
3
4
5
6
7
8
| @Slf4j
@Component
public class MqListener {
@RabbitListener(queues = "simple.queue")
public void mlsq(String msg){
System.out.println("收到的消息为:"+ msg);
}
}
|
6.测试
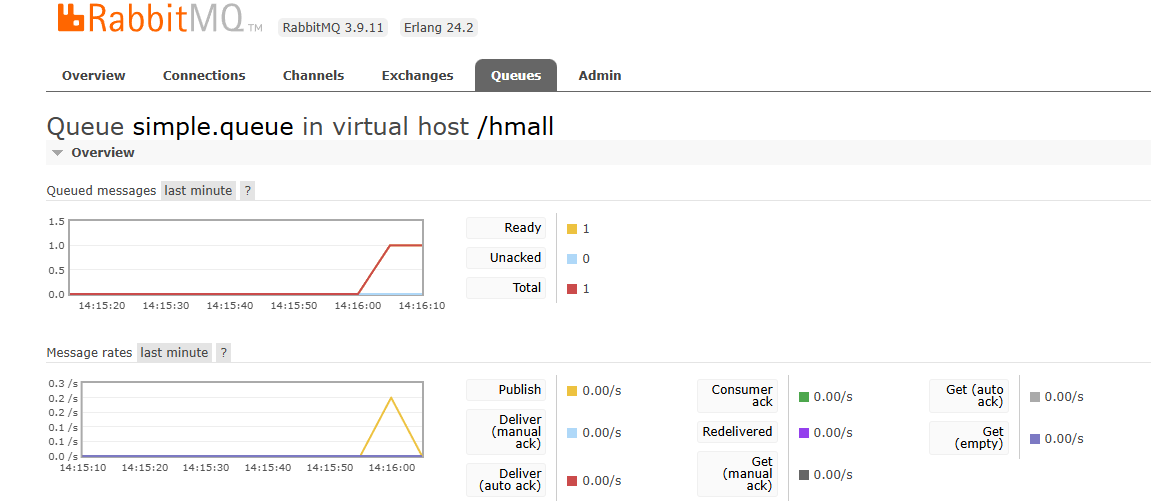
在启动consumer之前执行publisher的测试方法观察rabbitMQ网页端可看见未转发前的队列消息,但是当启动consumer类后再次执行测试方法则无法观察到网页端的消息,因为此时消息已经被消息队列转发到conumer端
启动consumer启动类,执行publisher的测试方法,验证可行性
成功consumer监听到了来自simple.queue的转发的消息,并执行了监听的方法
work queue
work模型(解决消息堆积问题)
多个消费者绑定到一个队列,可以加快消息处理速度
同一条消息只会被一个消费者处理
通过设置prefetch来控制消费者预取的消息数量,处理完一条消息再处理下一条,实现能者多劳
案例
在rabbitMQ控制台创建一个队列,名为work.queue
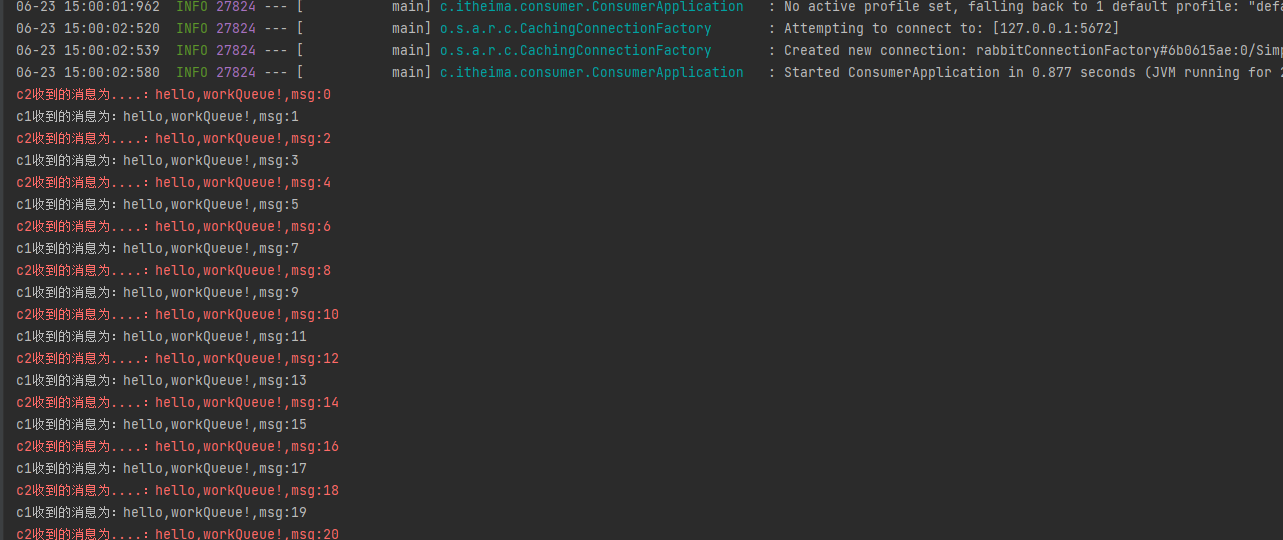
在publisher服务中定义测试方法,在1s内产生50条消息,发送到work.queue
在consumer服务中定义两个消息监听者,都监听work.queue队列
消费者1每秒处理50条消息,消费者2每秒处理5条消息
消息发送者发送50条消息
1
2
3
4
5
6
7
8
9
| @Test
void testWorkQueue() throws InterruptedException {
String queueName = "work.queue";
for (int i = 0; i < 50; i++) {
String msg = "hello,workQueue!,msg:" + i;
rabbitTemplate.convertAndSend(queueName,msg);
Thread.sleep(20);
}
}
|
接收端接受消息
1
2
3
4
5
6
7
8
| @RabbitListener(queues = "work.queue")
public void lwq1(String msg) throws InterruptedException {
System.out.println("c1收到的消息为:"+ msg);
}
@RabbitListener(queues = "work.queue")
public void lwq2(String msg) throws InterruptedException {
System.err.println("c2收到的消息为....:"+ msg);
}
|
接受消息的方式按照轮询的方式分配给消费者
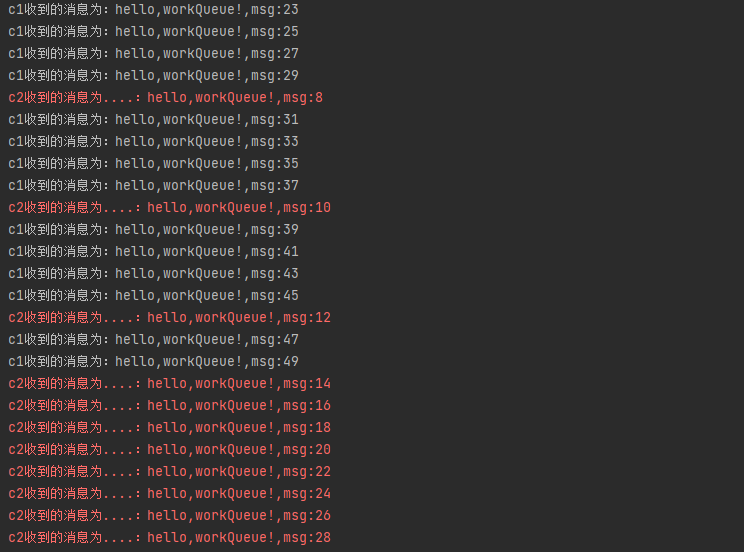
当消费者性能不一致时
1
2
3
4
5
6
7
8
9
10
| @RabbitListener(queues = "work.queue")
public void lwq1(String msg) throws InterruptedException {
System.out.println("c1收到的消息为:"+ msg);
Thread.sleep(20);
}
@RabbitListener(queues = "work.queue")
public void lwq2(String msg) throws InterruptedException {
System.err.println("c2收到的消息为....:"+ msg);
Thread.sleep(200);
}
|
还是按照轮询的方式进行分配,并且出现了消息堆积的现象,性能高的消费者优先完成,性能差者消息堆积
解决办法
1
2
3
4
5
6
7
8
9
10
| spring:
rabbitmq:
host: 127.0.0.1
port: 5672
virtual-host: /hmall
username: hmall
password: 123
listener:
simple:
prefetch: 1
|
加入prefetch,每次必须完成一条消息后才可以进行下次消息处理,性能更强的消费者分配的消息更多,能者多劳
Fanout交换机
fanout交换机
真实的生产环境都会经过exchange来发送消息,额不是直接发送到队列
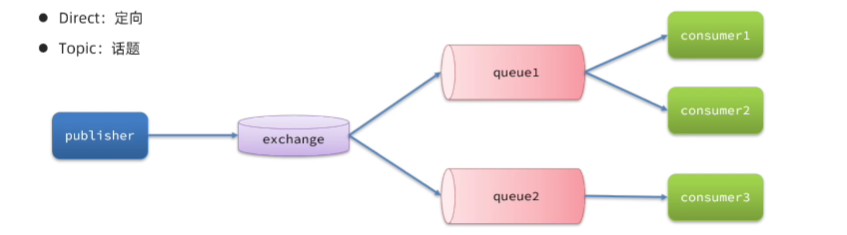
交换机的类型有以下三种
Fanout:广播
Direct:定向
Topic:话题
作用:
接受publisher发送的消息
将消息按照规则路由到与之绑定的队列
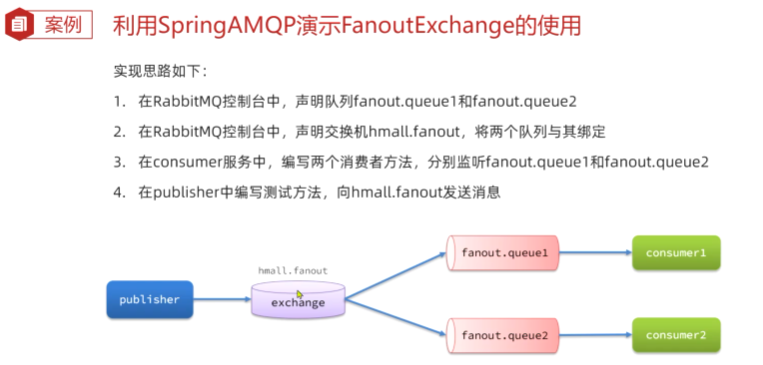
FanoutExchange会将消息路由到每个绑定的队列
Fanout Exchange会将接受到的消息广播到每一个跟其绑定的queue,所以也叫广播模式
案例
consumer服务中的两个消费者
1
2
3
4
5
6
7
8
| @RabbitListener(queues = "fanout.queue1")
public void lft1(String msg) throws InterruptedException {
System.out.println("c1收到的f1消息为:"+ msg);
}
@RabbitListener(queues = "fanout.queue2")
public void lft2(String msg) throws InterruptedException {
System.err.println("c2收到的f2消息为....:"+ msg);
}
|
向交换机发送消息并广播
1
2
3
4
5
6
7
| @Test
void testSendFanout(){
String exchange = "hmall.fanout";
String msg = "hello,fanout!";
rabbitTemplate.convertAndSend(exchange,null,msg);
}
|
与交换机绑定的消息队列,都收到了由fanout交换机广播到的消息并转发给对应的消费者
Direct交换机
direct交换机
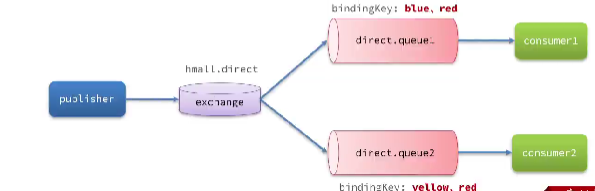
每一个消息队列都与交换机设置一个BindingKey
发布者发布消息时,指定消息的Routingkey
交换机将消息路由到BindingKey与消息RoutingKey一致的队列
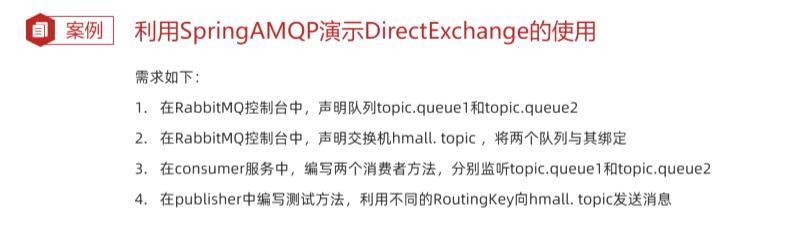
案例
新建一个交换机hmall.direct
新建两个队列 direct.queue1 direct.queue2
direct.queue1与交换机的bindingKey为 red 和 blue
direct.queue2与交换机的bindingKey为 red 和 yellow
1
2
3
4
5
6
7
8
9
|
@RabbitListener(queues = "direct.queue1")
public void ldq1(String msg) throws InterruptedException {
System.out.println("c1收到的d1消息为:"+ msg);
}
@RabbitListener(queues = "direct.queue2")
public void ldq2(String msg) throws InterruptedException {
System.err.println("c2收到的d2消息为....:"+ msg);
}
|
测试1
向交换机发送消息,指定消息的routingKey为red
1
2
3
4
5
6
| @Test
void testSendDirect1(){
String exchange = "hmall.direct";
String msg = "red";
rabbitTemplate.convertAndSend(exchange,"red",msg);
}
|
因为direct1.queue1 和 direct.queue2都绑定了red,所以都能收到消息
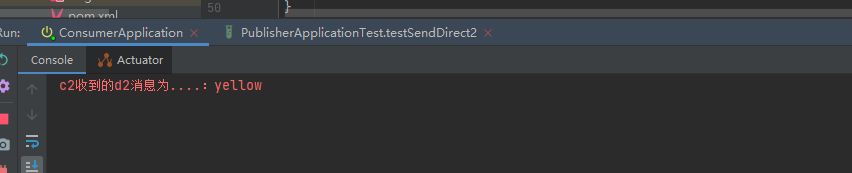
测试2
1
2
3
4
5
6
| @Test
void testSendDirect2(){
String exchange = "hmall.direct";
String msg = "yellow";
rabbitTemplate.convertAndSend(exchange,"yellow",msg);
}
|
因为只有direct.queue2绑定了yellow,所以只有消费者2接收到了消息
Topic交换机
Topic交换机
TopicExchange与DirectExchange类似,区别在于routingKey可以是多个单词的列表,可以用.分割
Queue与Exchange指定BindingKey时可以使用通配符
#: 表示0个或多个单词
*: 表示一个单词
案例
1
2
3
4
5
6
7
8
9
10
|
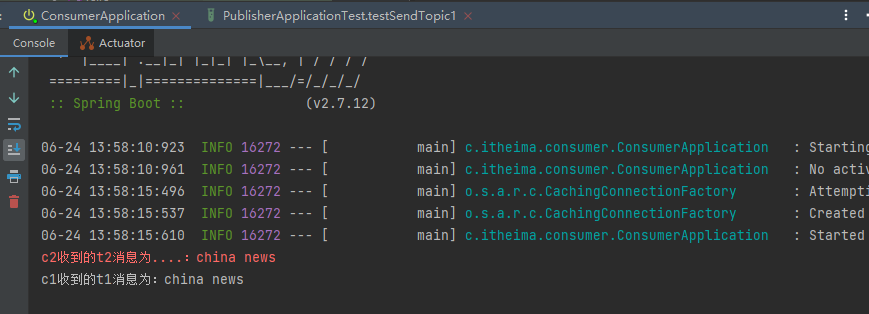
@RabbitListener(queues = "topic.queue1")
public void ltq1(String msg) throws InterruptedException {
System.out.println("c1收到的t1消息为:"+ msg);
}
@RabbitListener(queues = "topic.queue2")
public void ltq2(String msg) throws InterruptedException {
System.err.println("c2收到的t2消息为....:"+ msg);
}
|
测试1
1
2
3
4
5
6
| @Test
void testSendTopic1(){
String exchange = "hmall.topic";
String msg = "china news";
rabbitTemplate.convertAndSend(exchange,"china.news",msg);
}
|
因为topic.queue1绑定的为china.#,topic.queue2绑定的为*.news两者都满足
测试2
1
2
3
4
5
6
| @Test
void testSendTopic2(){
String exchange = "hmall.topic";
String msg = "china weather";
rabbitTemplate.convertAndSend(exchange,"china.weather",msg);
}
|
c1的bindingKey是china.#,故c1收到消息
测试3
1
2
3
4
5
6
| @Test
void testSendTopic3(){
String exchange = "hmall.topic";
String msg = "word news";
rabbitTemplate.convertAndSend(exchange,"word.news",msg);
}
|
声明队列交换机
声明队列交换机
Queue: 用于声明队列,可以用工厂类QueueBuilder构建
Exchange: 用于声明交换机,可以用工厂类ExchangeBuilder构建
Binding:用于声明队列和交换机的绑定关系,可以用工厂类BindingBuilder构建
基于Bean的声明
1
2
3
4
5
6
7
8
9
10
11
12
13
14
15
16
17
18
19
20
21
22
23
24
25
26
27
28
| @Bean
public FanoutExchange fanoutExchange(){
return ExchangeBuilder.fanoutExchange("hmall.fanout2").build();
}
@Bean
public Queue fanoutQueue3(){
return QueueBuilder.durable("fanout.queue3").build();
}
@Bean
public Queue fanoutQueue4(){
return QueueBuilder.durable("fanout.queue4").build();
}
@Bean
public Binding fanoutBinding3(Queue fanoutQueue3,FanoutExchange fanoutExchange){
return BindingBuilder.bind(fanoutQueue3).to(fanoutExchange);
}
@Bean
public Binding fanoutBinding4(){
return BindingBuilder.bind(fanoutQueue4()).to(fanoutExchange());
}
|
当使用的是Direct交换机时,一个交换机绑定多个bindingKey时,将会使得代码繁多,冗余
1
2
3
4
5
6
7
8
9
10
11
12
13
14
15
16
17
18
19
20
21
| @Bean
public DirectExchange directExchange(){
return ExchangeBuilder.fanoutExchange("hmall.direct").build();
}
@Bean
public Queue directQueue1(){
return QueueBuilder.durable("fanout.queue3").build();
}
@Bean
public Binding directBindingRed(Queue directQueue1,DirectExchange directExchange){
return BindingBuilder.bind(directQueue1).to(directExchange).with("red");
}
@Bean
public Binding directBindingBlue(Queue directQueue1,DirectExchange directExchange){
return BindingBuilder.bind(directQueue1).to(directExchange).with("blue");
}
|
基于注解的方式声明
1
2
3
4
5
6
7
8
9
10
11
12
13
14
15
16
17
18
19
20
21
| >
@RabbitListener(bindings = @QueueBinding(
//durable 持久化
value = @Queue(name = "direct.queue1",durable = "true"),
exchange = @Exchange(name = "hmall.direct",type = ExchangeTypes.DIRECT),
key = {"red","blue"}
>))
>public void ldq1(String msg) throws InterruptedException {
System.out.println("c1收到的d1消息为:"+ msg);
>}
>
@RabbitListener(bindings = @QueueBinding(
//durable 持久化
value = @Queue(name = "direct.queue2",durable = "true"),
exchange = @Exchange(name = "hmall.direct",type = ExchangeTypes.DIRECT),
key = {"red","yellow"}
>))
>public void ldq2(String msg) throws InterruptedException {
System.err.println("c2收到的d2消息为....:"+ msg);
}
|
消息转换器
默认消息转换器的问题
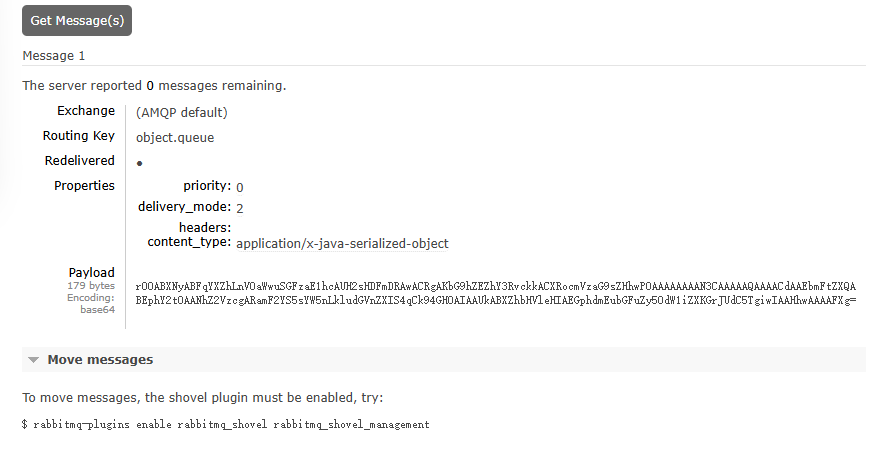
利用SpringAMQP发送一条消息到RabbitMQ的客户端,观察在Object.queue中接收到的消息反映了什么问题?
1
2
3
4
5
6
7
8
9
| @Test
void testSendObject(){
Map<String,Object> msg = new HashMap<>(2);
msg.put("name","Jack");
msg.put("age",21);
rabbitTemplate.convertAndSend("object.queue",msg);
}
|
接受到的消息体积大,代码可读性低,安全性不高(反序列化执行非法代码)
在对Map类型的消息进行转换时,底层使其进行了(Serialization.serilize) ObjectOutputStream的字节流转换(JDK的序列化方式)
改变消息转换器
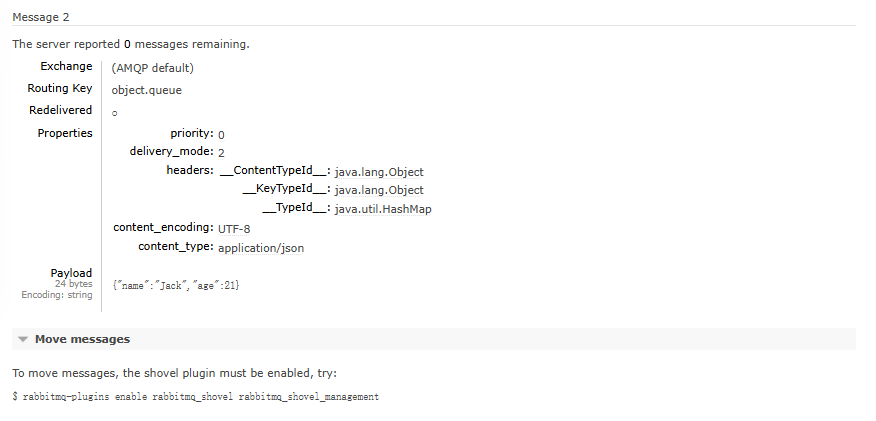
采用json序列化
1.引入依赖
在publisher和consumer中都引入jackson依赖,这里在父工程中引用
1
2
3
4
| <dependency>
<groupId>com.fasterxml.jackson.dataformat</groupId>
<artifactId>jackson-dataformat-xml</artifactId>
</dependency>
|
2.在启动类中声明jackson的bean
1
2
3
4
| >@Bean
>public MessageConverter jacksonMessageConvertor(){
return new Jackson2JsonMessageConverter();
>}
|
3.测试
1
2
3
4
5
6
7
8
| @Test
void testSendObject(){
Map<String,Object> msg = new HashMap<>(2);
msg.put("name","Jack");
msg.put("age",21);
rabbitTemplate.convertAndSend("object.queue",msg);
}
|
比之前接受的消息所占体积更小,可读性更高
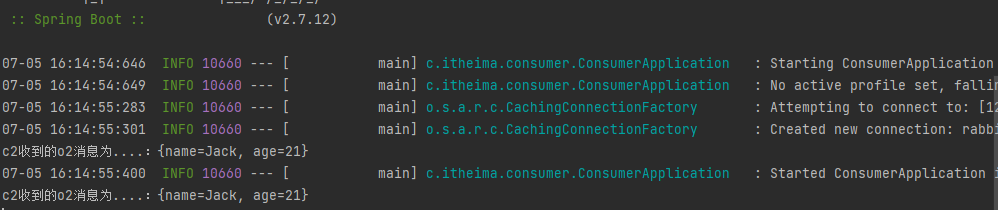
4.收到的消息
1
2
3
4
5
|
@RabbitListener(queues = "object.queue")
public void lo(Map<String,Object> msg) throws InterruptedException {
System.out.println("c2收到的o2消息为....:"+ msg);
}
|
消息可靠性问题
生产者重连
一般用于网络波动时,服务掉线的情况,设置重连机制保证网络波动时RabbitMQ的可靠性
1
2
3
4
5
6
7
8
9
| spring:
rabbitmq:
connection-timeout: 1
template:
retry:
enabled: true
initial-interval: 1000ms
multiplier: 1
max-attempts: 3
|
缺点:
这种方法是阻塞式,每次重试等待的过程中,线程是阻塞的,会影响业务性能
如果对于业务性能有要求,建议禁止使用重试机制,如果一定要使用,请合理配置等待时长和重试次数,当然也可以考虑使用异步线程来执行发送消息的代码。